Saturday, December 24, 2011

Glory to God in the Highest, and on Earth, Peace

Posted by: Paulette
The presents have been opened and copious amounts of candy consumed. I am looking forward to a joyous sabbath Christmas with family and some close friends. I can hope for peace, but it will have to come from within with that many people in the house!

Please enjoy a series of  beautiful videos  produced by my church, The Church of Jesus Christ of Latter Day Saints, about the birth of Jesus Christ.


We rejoice on this day that our Savior was born, who suffered and died to save us from our sins, and to succor us in our sorrows. 

                 Merry Christmas!

Wednesday, December 21, 2011

Peanut Brittle

Posted by: Paulette

One of my favorite things about Christmas is homemade candies. Today, I'm making peanut brittle. The first batch turned out...shall we say a bit smokey? If I'd waited until my candy thermometer read 300 degrees like the recipe suggested, my candy would have been black. So the birds got a Christmas treat. They'll love the peanuts!
As I've said before my photography skills could use some help. We all can't be good at everything, right? But I think this photo turned out well. You can see how glossy the candy is and the beautiful caramel color.
So, do you want the recipe? I thought so!

Peanut Brittle
  • 1 cup white sugar
  • 1/2 cup light corn syrup
  • 1/4 teaspoon salt
  • 1/4 cup water
  • 1 cup peanuts
  • 2 tablespoons butter, softened
  • 1teaspoon vanilla extract
  • 1 teaspoon baking soda

Directions


  1.   Spray a large cookie sheet with non stick spray. Set aside.
  2. In a heavy 2 quart saucepan, over medium heat, bring to a boil sugar, corn syrup, salt, and water. Stir until sugar is dissolved. Stir in peanuts.
  3. Stirring occasionally, watch the syrup. When it turns a caramel color, it's ready for the next step. You can also test the mixture occasionally, by using a metal spoon. Dip it into the syrup, and pull out and watch how it drips off the spoon. You want it to drip slowly. But the color is the key. 
  4. Remove from heat; immediately stir in butter , vanilla, and baking soda; pour at once onto cookie sheet.Push it around with the metal spoon. Then let cool. Snap into small pieces. 
If I had just watched the color, and trusted my instincts, the first batch would not have turned out smokey flavored. You'll smell the sugar begin to burn if the color gets too dark. So this is not the time to get on Pinterest!
Now, back to my candy making.

Labor Pains

Posted by: Paulette

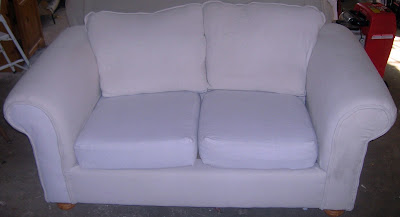
As you can see, I finished upholstering the loveseat. I was almost finished when I realized that there wasn't enough fabric to do the seat cushions, and I messed up the left arm front, and had to re cut it. This loveseat sits in front of the TV and gets well used, so it stays covered up with a slipcover. Therefore I'm not too worried about a little bit of mismatched fabrics. The original fabric was so thin and dirty from use, and the kids has started to tear i t off, so this project was a necessity.
 As you can see, we still haven't painted the floor. I'm not exactly sure when we will, and it bothers me, because of all of the paint that was splashed and dripped all over it by the contractors, but it's better than carpet!
 Speaking of carpet, the reason this post is called "Labor Pains" isn't because I am pregnant. It's because of the almost crippling pain I feel from cleaning the carpets with a Rug Doctor. Pulling the thing around wasn't the problem. It was the filling and emptying of the tanks! I had a very restless night trying to find a good position to sleep in, and woke up this morning so stiff! Some Tylenol, sports cream, and some fish oil capsules, and I'm finally able to move.
 As I was wrapping presents last night after looking at all of the beautiful blogs with beautifully wrapped presents, I was grumbling to myself about over achievers. There sure are a lot of Marthas out there! I don't know how they do it! Maybe it's just my perception of things. After looking through dozens of blogs, all of the inspiration starts to become guilt, for not being able to do everything. I can do all of that stuff. Just not all at once!
My plan today is to make some candies and cookies for stockings. We'll see how much I get done.

Friday, December 16, 2011

Life's Curve Balls & Kids Are Funny

Posted by: Paulette
A few things happened this week that got me thinking about how we can make plans, an be inspired to do good things, but life seems to always have a different plan for us. I have a TON of things to get done this week. We have house guests getting here on my wedding anniversary, the 22nd. Dave and I plan to take some time for our selves of course, with the understanding from our guests that the adults are invited to come along of they wish.
Certain projects have had to be postponed. I think I'm okay with that.
After our date last night, our babysitter told us that there was some good news, and some bad news. The bad news was that the leg of the loveseat broke off. I took a look at it and fixed it in a matter of minutes. Or so I thought. It came off again today. So, since we had another loveseat in the garage waiting to be reupholstered, I decided to start on that today. Now my back is killing me!
Hopefully I can gather the strength, and willpower to finish it tomorrow. We may end up using it as bedding for one of the children next week! I'm hoping it will look like this when it's finished.


 But with different feet.


Okay, are you ready for something funny? Thursday, I discovered that I had more money in my bank account than I thought. After some investigation, I learned that my doctor's office had double charged me, and this was a refund. So the long awaited grocery shopping excursion happened. I guess we've been broke for so long, that the kids believed us when we said we had no money to buy food. Now, you must understand that we have staples and food storage, so they weren't going hungry. In fact, I was making them pancakes every morning and muffins for snacks in the afternoon. But to them it's a crisis if we run out of milk and cereal. When they got home from school, they were shocked to see the cupboards and fridge full, and fruit in the bowls all over the counters. They said, "what are you doing? We can't afford all of this stuff!"
David laughed, and told them that they were right and that mommy was going to have to return some of it. Such a tease! I love that man!
But I do agree that it's nice having some unexpected funds to play around with during the holidays. How else could I buy staples and tack strips to reupholster my loveseat at the last minute! I think I may need a chiropractor soon.  hopefully the money doesn't run out before then. Ouch!

Tuesday, December 13, 2011

Dark Chocolate Gluten Free Muffins

Posted by: Paulette

Again, I have to confess that this is not a picture of the muffins in my recipe. But they look pretty close. Food photography is a gift that I do not have. I did take a picture of the muffins I made, and it looked like a turd on a plate. Hopefully I haven't spoiled your appetite, because these are really good!

Gluten Free Dark Chocolate Muffins
Makes 19 muffins

Preheat oven to 350 degrees
Spray muffin tins with non-stick baking spray, or line with cup cake liners.
I atually think they turn out better without the papers. GF bread products tend to stick to the paper.

3 Cups Gluten Free bread flour
3/4 Cups Cocoa
1 1/2 Cups sugar
1 Tablespoon Baking powder
1 teaspoon sea salt
3 eggs
1/2 cup oil
1 3/4 cups milk (I use goat's milk or soy milk)

Mix all ingredients together in a large bowl. Fill muffin tins 3/4 full with batter. Bake for 20 minutes, or when you touch the top they spring back.

Okay, just in case you think I'm lying, here's my picture:
See. I told you. Enjoy your muffins. they taste like the first picture. I promise.

New Beginnings

Posted by: Paulette

I've started a new set of dolls. These are smaller than I've ever sculpted before. I've always been amazed by doll artists who are able to work at such a small scale. I've discovered that it's actually easier. Less clay, means shorter baking times, and being able to hold the piece for longer periods of time without your hand cramping.

Getting good pictures with my crappy camera, on a rainy day is another story.


This is Joseph's head for the new nativity. We collect nativities, and have lost a few over the years through breakage. Our very first nativity was a gift from myself to Dave. It's interesting to see how my skills ave changed over the years. I think I'm really going to like this one. Hopefully I can get it done before Christmas.

Guess who won the battle of the stockings

Posted by: Paulette


I told you yesterday about how my almost 5 year old daughter, Katie was throwing a fit about me wanting to make new stockings. After going back and forth between two arguments:
The house is the kids, not just mine
and
I want a cleaner more grown-up look
The second argument won. I made the stockings assembly line style, and after completing the first one, Katie asked where hers was. I let her switch them out on the mantle. She felt like she was Mommy's helper and it seemed to appease her. That was until it was time to put the other ones in the donation pile. And then I remembered that we have a family of 6 coming to visit for Christmas. We could use those stockings for them!
Problem solved.
 
 There are a ton of how to make a Christmas stocking tutorials available on the net, so, I'll just tell you a little of what I did. 
Edited to add link of tutorial
The girl's stockings have pleated cuffs, and the boy's stockings have welting. I used canvas drop cloth fabric. It's becoming my favorite to work with. Once it's washed, it's not stiff anymore. And I love the color.
The cuff of the stockings is made from a old bed skirt that I cut apart. I still have a ton of fabric, and all of the lace edging for other projects. I think this one got caught in the vacuum and ended up with black stains from the belt.
The painted on initials is done with acrylic paint, mixed with fabric medium. I used a fine line brush to fill in the outline that I'd made with a pencil. I put the letter I wanted under the white fabric and was able to see through to trace. The bells are strung onto red ribbon and the then sewn with a bow over the top to the top of the stocking.


I'm not very happy with how the script turned out. What is it they say, and optimist writes upward and a pessimist writes in a down slant? I guess I'm an optimist.
Remember the doors I painted with chalkboard paint this Fall, that were from my entertainment center? There they are, put to good use.


This was the very first Christmas present I ever gave Dave. We weren't even sure we'd be able to afford a Christmas tree that year. This nativity holds a special place in our family history, and the kids know they're in BIG trouble if they touch it. It lasted 13 years without any real damage. Sophia, 3years, took down some pieces to play with while I wasn't paying attention and broke some of them. thank God for super glue!

Monday, December 12, 2011

The Winter of Our Discontent

Posted by: Paulette
I've always been a DIYer and a thrifty kind of wife and mom. This is why when I discovered all of the beautiful blogs out there and then Pinterest, I was so inspired by all of the gorgeous decor! One of my favorite blogs is Dear Lillie. Jennifer has some really yummy stuff in her house. I love her style.

source

This spring, I started painting and slip covering the furniture. The paint is easy to wipe clean, and the slipcovers are easy to take off and toss in the wash. I have more than one set of slipcovers, so that I don't have to worry about those "accidents" with the yogurt or scissors while the nice slipcovers are being laundered. And in a pinch, I've even thrown a sheet over the loveseat, when I had nothing else available.

 Another favorite site is Funky Junk Interiors. Donna takes every day stuff and gives it a new identity. I've copied some of her re-purposing techniques with great success.
  
source    
While looking through these and other inspiring blogs, I get an itch to create. And what I've learned is that if you wait long enough, the things you want will come to you at a price that you can afford.
Miss Mustard Seed or Marian, taught me how to make a fitted slipcover from canvas painter's drop cloths. I already knew how to make a slipcover, but getting fabric for so cheaply was news to me. The largest drop cloth was only $30, and was enough fabric to cover two chairs.
source 
Today I wanted to make some new matching Christmas stockings. I already have the fabric. I am running into some trouble with my eldest daughter, who wants to keep the old ones. What to do?
So now that I've shared my inspiration blogs, will you still come and visit me here? I hope so!
               Happy Christmas!

Saturday, December 10, 2011

Dollhouse

Posted by: Paulette

I finished the bookshelf dollhouse today. In all, it took about 3 weeks of work.
I got the white bookshelf from Goodwill for $3.50 on their half off Saturday. The furniture is made from cardboard, mostly from diaper boxes, newspaper, glue (TONS OF GLUE), fabric, felt and paint.
Bedroom


The furniture was put together as boxes. Rectangles glued together with hot glue, and the covered all over with school glue and newspaper. When dry, I added the details, like tiny buttons for drawer/cabinet pulls etc. And then painted them with acrylic craft paints.


The linens are sewn in miniature. And the headboard was tufted with tiny buttons. The lamps are made from a scrap of lace, dowel and a button. The flooring and wallpaper in this room were done with scrapbook papers.
Livingroom 
The fireplace was made of cardboard and newspaper. The couch was made of cardboard, layers of felt, and fabric, all hot glued to the cardboard. The planters next to the fireplace are spools from thread, and the "candles" on the fireplace are beads.
I didn't buy anything except the bookshelf for this project. It was made from things I already had. I guess that's a great argument for hoarding, right?
The curtain rod is made from a bamboo skewer, and the finials on the end are pearl beads.
Kitchen right
Everything is hot glued into the house, so that the furniture isn't lost or destroyed by water. The rug was made of strips of fabric, crocheted into a chain and then sewn into a circle. When I started making the appliances for the kitchen, I thought it would be fun to give it a retro look. And I've always loved cherries.
 The EAT and utensils on the wall are made from
cardboard that was painted to look like zinc.
Kitchen, left


Bathroom

By the time I'd gotten to putting the bathroom together, I realized that it would be easier to make the faucets from oven bake clay, than paper mache. So they look more realistic in the shower. I made some boo boos, while putting the furniture into this room and scratched the paint. You can see where I tried to match the color and failed. All houses have imperfections. Why not this one?

It was a failure keeping the dollhouse a secret. So the girls know about it already and have attempted to play with it already.
All of the furniture is Barbie size. Thank goodness I don't have to make the dolls too!
One more present down and I don't want to think about how many more to go. It's 2 weeks until Christmas, and we have house guests coming. Aaaaak!

Thursday, December 8, 2011

Christmas Dresses 2011

Posted by: Paulette

A friend from church gave a bag full of scraps of decorator fabrics. She said it was "for my dolls."
I didn't have a  thought of how to use them for the dolls that I make, but after going through the bag, I realized that I could make dresses for my dolls! The gold dress that I made for Katie uses the fabrics from the bag. All I added was the turquoise lining on the cape. And I already had that scrap of fabric too! These kinds of fabrics can be so expensive, so I was so thankful to have  received them.
 Please excuse the grooming of my models. It's Thursday morning. Self explanatory to all you moms out there reading this. LOL!
I got my inspiration for this  from two pictures that I found on the internet. I pinned both dresses, and was able to find a tutorial on how to do the pick up skirt. The bodice is lined with the same fabric as was used in the skirt. I used a dress that was in Katie's size for the template for the bodice and changes the neckline and sleeve. There were a ton of fittings for this dress, which drove Katie crazy! And the first time I put together the bodice, I put in the sleeves upside down. Since I'm the one who made the pattern, there should be no excuses, right?!

 I cut the bodice so close that I was afraid that after putting in  the zipper, that it would be too tight. Thank goodness it fit, or I would be throwing a fit!
As I mentioned before the capelet fabric was in the bag, but the turquoise satin used to line it, came from a scrap from the girl's Christmas dresses a few years ago.


Sophia's dress is made from a piece of peach skin that was gifted to me by my mother this summer. I thought I'd might make myself a skirt, but while searching through my fabrics, I knew I wanted to make a capelet from the "dalmatian" print faux fur.
 ?I don't remember where the satin came from, but it was a PAIN to work with. It kept on fraying like crazy! I finally grabbed a lighter and singed all of the edges before trying to work with it. That did it! It was like using ribbon after that.
How do you like that peanut butter and jelly face? Adorable!


 I can tell that Sophia loves this dress. All of the ruffles and the circle skirt are just her style.
I'm pretty sure this bodice came together because of lots of praying. It was cut without a pattern, and fitted to my model.
It's a good thing that Sophia and Katie are the same size, so that I could use both of them for fittings! I'm still not very happy with the way the sleeve turned out, but I've used every bit of fabric on this one.

The double circle skirt came about because I didn't think the top one was long enough. I came across the rhinestone buttons while shopping for more thread and a zipper. Originally I was going to do a covered button with the faux fur. When I couldn't find a covered button set at Wal-mart, I decided upon these. I like this better. It adds just the right amount of glitz.

Now if I can just jeep these dresses away from the girls until Christmas...

Wednesday, December 7, 2011

Gluten free dairy free cranberry bliss bars

Posted by: Paulette

  
First, I have to admit that this is not a picture of the cranberry bliss bars I made. I'm pretty good about writing stuff up on my blog, but horrible about taking pictures of the process or the final product.
The back story of this project went like this. My workout buddy called me yesterday, and told me that I shouldn't expect her at the gym for a while. She was in a car accident about two weeks ago and is suffering from some bulging discs in her back. Personally, I have no experience with this injury, but my mom does. She was in a car accident 30 years ago, and has had other accidents since then (never her fault) and has suffered with this condition since then. So, I know how debilitating this injury can be. When she asked me for a favor I was happy to serve.
 Tami had promised to make some treats for the friends of her daughter for a church activity. I am lucky enough to have a workout buddy that shares some of the same food allergies that I endure. She asked me to make the Starbuck's Cranberry bliss Bars. She even e-mailed me a video of how to make them. The trick was to convert the recipe to gluten free and dairy free. And I did. I had one little bar before her husband whisked them away to her daughter's young women's activity, and I have to say, I WILL be making these again.
 So, I'll bet you'd like the recipe, right? Well....Let me get right to that!
First of all I should tell you about some of the special ingredients you'll have to pick up. The first one is a crea cheese substitute that is made from soy. It's called Tofutti. You'll only need half the tub, so there's enough there for a double batch! Bwahahahaha!


The other thing you'll need is a gluten free flour. I used a GF bread flour that I get at Sprouts. Any GF flour will do. I just get the biggest cheapest bag.

The other thing is xanthum gum. You've probably read that this is an ingredient in some processed foods. 
Wickapedia has this to say:
Xanthan gum is a polysaccharide, derived from the bacterial coat of Xanthomonas campestris, used as a food additive and rheology modifier,[2] commonly used as a food thickening agent (in salad dressings, for example) and a stabilizer (in cosmetic products, for example, to prevent ingredients from separating). It is produced by the fermentation of glucose, sucrose, or lactose by the Xanthomonas campestris bacterium. After a fermentation period, the polysaccharide is precipitated from a growth medium with isopropyl alcohol, dried, and ground into a fine powder. Later, it is added to a liquid medium to form the gum.[3]

It's used to bind the ingredients together. Since we don't have gluten, you'll need something to do this. If you don't want to buy a whole container of the stuff, since you'll only need a teaspoon, you cam leave it out, but your cookie won't hold together as well.

The other ingredients, you'll be able to find at your grocery store.

CRANBERRY BLISS BARS
Preheat oven to 350 degrees.
Cookie:
1 1/4 cups packed brown sugar
3/4 cups (or 1 1/2 sticks) softened margarine
3 eggs
1 1/2 tsp vanilla
1/2 tsp salt (sea salt preferred)
1 Tablespoon fresh grated ginger (or 1 tsp ground ginger)
1 1/2 cups gluten free flour
1 tsp xanthum gum


Mix with a wooden spoon until ingredients are incorporated, then add:
3/4 cups dried cranberries
4 oz white chocolate chips
and mix


Spray a 9"x 13" pan with nonstick spray, and then spread the cookie dough evenly into the pan. Bake in 350 degree oven for 20 minutes.


While your cookie bakes, make the 
Frosting:
4 oz Tofutti cream cheese substitute
4 tsp fresh lemon juice
1 tsp vanilla 
Mix together above ingredients with a whisk, and then add 1 cup at a time:
3 cups confectioner's (powdered) sugar

When your cookie is cooled, frost the top.
Next, sprinkle, 1/4 cup chopped, dried cranberries.
(I used more than this and didn't chop them. I LOVE Craisins!)

Then make the 
Icing: 
1/2 cup powdered sugar
1 Tablespoon soy milk 
2 tsp vegetable shortening


Cut the very tip off of a plastic sandwich bad, and load the icing into it. Drizzle over the top.


The original recipe said to chill before cutting, but in my house we're luck enough for the cookie layer to cool before getting the other toppings on. And to tell you the truth, I think the cookie layer by it self is pretty darn good!


ENJOY!
Hee hee! I just a got a text from Tami, she says:
"Oh my heavens!!! You knock their socks off at Starbucks, this is 10x better!!! Thanks a million :)


Sunday, December 4, 2011

Gift Plans for Christmas

Posted by: Paulette

When I asked Katie (4years) what she wanted for Christmas, she said, "a play stove and a pink house."
So, being the good little crafty mommy that I am, I started doing "research." 
This means looking at Pinterest for ideas. If you'd like to follow me I'm here. I've found so many good ones. I was able to purchase a book case for $3.50 at Goodwill this weekend, and  this is my inspiration picture:


The book shelf I bought isn't as large, and will only have 4 rooms; a master bedroom, bathroom, kitchen, and living room. I'm making the furniture Barbie size with cardboard, paint and fabrics. I can't wait to show you when it's finished. Time to pull out the scrapbook papers and paints!

The kitchen will be made from an entertainment center that I got for $7.50 on the same Goodwill trip. Here are my inspiration pics for that project:


I haven't decided on the color yet, and I have to draw my design and gather some supplies, a big bowl for the sink, some knobs for the stove, and a kitchen faucet. I'm looking on Craig's list for one. I may just end up using the one that's on our kitchen sink right now, and replace that one, since it needs to be replaced. Merry Christmas to me, right? Just what I've always wanted for Christmas, a new kitchen faucet!
Oh, well, sometimes the magic of Christmas is all used up by the time you make and buy gifts for all 5 kids.
Speaking of...
I've also been looking on Pinterest for ideas for the boys. Shhh! Don't tell. I've told them that I'm not making anything for them this year. That they're just getting gift cards.
Here are some of the ideas:
Flag blanket
 Made from flannel and denim. Easy! And it would go with their bedroom. This would just be one that they could use to curl up with and read a good book. My boys spend a lot of time of their bedroom floor reading.

stand up swing 
 I love this idea. We have two large trees in the front yard that they a re always climbing. I think it would be great fun to have a couple of these. I bet the neighbor kids would love them too. I'm on the lookout for a couple of used skateboards.

Marshmallow shooters
I recently had a Pack meeting with the cub scouts where we had an indoor snowball fight using marshmallows. It was a blast!
So, those are my ideas. I just hope there's enough time to execute them. I usually start crafting for Christmas aroud Halloween, but, I've just had a hard time getting into the spirit this year. I don't know if it's because my boys are getting older, or what.
So, what are your crafty plans?

sprouting chia seeds

Posted by: Paulette
After learning of all of my food allergies, a friend of mine called and asked if I'd ever tried eating chia. The only chia I knew of was the seeds that are used on chia pets. I didn't know that they were edible.

Not only are they edible, but they are a sort of super food! I bought a bag of seed at Sprouts, and it sat in my cabinet forgotten for about 3 weeks. While putting away the groceries this week, I found the bag, and decided to try sprouting some. Phase one was to put a wet paper  towel into the bottom of a glass dish, and sprinkle the seeds on top. The next day, they had developed a slime, and reminded me of little insects. Not too appetizing, huh?
About 3 days later, I have begun to see their sprouts emerging, and while I wait to taste them, I did a little research. This article says that the natives of Southwest America, used to use them as Currency, and that 1 tablespoon, with water, was enough food to sustain a man 24 hours, even while performing hard labor. WOW! This sounds like just the boost I need. Since I can't eat most vegetables, I've been feeling so tired.
Richard Lucas, in his book, ‘Common and uncommon uses of herbs for healthy living’, encourages anyone to try it, and discover its unique ability to provide the go power to get through a busy day with a hop, skip and a jump.

 In addition to the above, chia has 5 times to amount of calcium as milk. Cow's milk is another of my allergens. So, now, instead of spending big bucks on goat's milk products for my calcium, I can add some chia seed to my morning protein smoothie.


 The above mentioned article touts all of the miraculous uses and reasons to add chia to your diet. A digestive aid, large amounts of protein, and abilities to rid the body of toxins are just a few more. I'm going to let my chia sprout a little longer before eating them, but I think that I'll soak some tonight to add to my smoothie tomorrow morning, since I've just found out that they need to be soaked over night before being used. I hope that I'll get some more energy tomorrow. I have so much to do!

Saturday, December 3, 2011

Legend of Zelda Mural

Posted by: Paulette


Six months ago my babysitter, a 16 year old young man, asked me if we could work out a trade. He would give me a full month of babysitting my 5 kids in trade for me painting a mural on his sister's bedroom wall. She is on a mission for our church in Chile, and is expected to return in January.
 I thought that this would be a fair trade, and I love painting, so, I agreed. Little did I know, that the mural he wanted me to paint was on the entire wall. All 8.5' x 14' of it. I got to work right away making some drawings on freezer paper. The characters would be three feet high.

 I had planned to also do a large tree, and when I got there to begin transferring the images to the wall, he told me that he'd had a conversation with her and she said she preferred the temple.
 I hate drawing and painting architecture. I've done it before, on a smaller scale. And I hate using rullers and levels and such when I paint!
  He provided a 3 foot level and that did help, but at the end, I was just winging it. I worked four hours at a time, for six months off and on, on Saturdays, and finally finished this today. It took a  TON of paint.
Next time someone asks me to paint them a mural, I'm going to have to ask how big, before going into negotiations. Lesson learned.
I am sooo glad it's finished in time for his sister to walk into her room for the first time in 18 months. I hope she likes it. He says she will.
I apologize for fuzzy pictures. It was rainy today.

Sunday, November 27, 2011

Crazy quilt style bird ornaments

Posted by: Paulette


I have been collecting lace scraps as long as I can remember. Any piece larger than 2 inches was worth keeping. That makes for a pretty big bag of scraps. I made a skirt with some of it, crazy quilt style. It's pretty heavy and almost like wearing a quilt.
My love of birds just keeps growing. I want them all over the Christmas tree. Every year I make a new set of ornaments. I usually give out some as gift and keep some. This year I thought I'd combine my lace and bird love together.


These bird ornaments are made from a very simple pattern. First I cut rectangles of cotton canvas leftover from making slipcovers. On those rectangles, I sewed the lace all over, then folded the rectangles in half, and traced the bird pattern on what was going to be the inside of the bird, or the wrong side of the fabric. Then sew around the design, leaving a 1" opening. Cut around seam leaving 1/4" seam allowance. Turn and stuff tightly. Sew the opening closed using the ladder stitch, and sew on a fan of lace for the tail, and some almond shaped scraps for wings. A ribbon sewn  to the top becomes a hanger. Two beads or small buttons are then sewn on for eyes.
I still have quite a bit of lace scraps left for the next project.
Maybe I'll make more of these for presents. They could also be stuffed with lavender or cloves for sachets.