Sunday, February 27, 2011

Fruits of My Labors a Day of Canning

The Fruits of my Labor

After waking up to the news about inflated gas and food prices two days in a row, and paying $3.21 a gallon for gas this week, and seeing the rising prices of produce, I started feeling some anxiety about being able to provide well for my family. The story of Noah came to mind. While he was building an ark, his neighbors scoffed at him, but when the rains came down, he and his family were safely inside. My church recommends that we keep a years worth of food storage on hand. In years past I've done a pretty good job of adding to that storage. The problem is that I have developed an allergy to wheat, which precludes processed foods from my diet. If I eat something canned in a public facility, I run the chances of having an attack of hives and asthma like symptoms. Frequent trips to the emergency room don't go well on the family budget. So I've decided to start enlarging my ark. This means a lot of hard work, but the peace of mind will be worth it. This week, I've started by canning peaches and tomatoes. Canning is an easy process that most people can do, but it does take a lot of time and is MESSY. I've chronicled my efforts  to share the process. Maybe it will make you more confident. I start by buying the produce that's the cheapest. I know that peaches in February seem strange, but my farmer's market had them for $.68 a pound. Usually I like freestone peaches for canning, but this is what they had, and this is what I'll use. 


 I started by washing all of the produce.

Beautiful newly washed peaches


 Usually when you can peaches, you remove the skins. I started doing this and decided, what the heck? These are for my family, not the state fair, they don't have to be pretty, just taste good! I have a picture here of blanching the peaches, but be advised, I didn't do this for long!


Blanch peaches a few seconds for skin removal


 Then the peaches had to be cored and sliced, and placed into lemon juice. The lemon juice does two things. It prevents the peaches from turning brown while I'm waiting to can them, and the extra acid prevents bacteria growth in the canning process. There are 7 things that act as a preventative in food spoilage: heat, cold, sugar, oil, salt, acid, and lack of air. (In canning the peaches I've used four of them.)

Peaches sliced and sitting in lemon juice


Next I made a syrup of water and sugar and let that boil on the stove. You can fins a chart for different kinds of canning syrups here. I used the light syrup. 


Washing the jars, lids and rings in the dishwasher and then putting them on a towel lined cookie sheet in the oven (set to 200 degrees F) and putting the lids into a pot of simmering water to soften the rubber rings, took up the time necessary to prepare the tomatoes for cooking down. Multitasking! I washed the tomatoes and then cut them into half and then quartered them  and placed them into an electric cooker (mine is from Saladmaster) at 300 degrees F. I left them there to cook down into a sauce, only stirring occasionally. I wanted some of the burnt on crust in the tomatoes. It gives them a richer flavor.

Cooking down tomatoes at 300 degrees


When the jars were hot enough, and my water in the huge pot was boiling for the hot water bath, as well as the syrup, I began bottling. 

HOT jars be careful!

Take a jar from the oven, place it onto a cookie sheet ( this aids in clean up, your spilled syrup won't go all over the counter) and using the canning funnel, add peaches to the jar. 

Adding peaches to jar


Next ladle the syrup over the top, leaving a 1/4" heads space. 

Pouring boiling syrup in jars

I know I look awful on this picture. It's not a beauty contest right? LOL!


magnet tool helps remove lids from hot water

Place the lid and the ring on the top, and use your jar grabber to place the jar into the hot water bath. 

Jar grabber for placing and removing hot jars in boiling water bath

Process in bath for 15 minutes, remove and place on counter to cool. When cooled, (this will take about 4 hours) remove the ring, and pull up lightly on the lid to test the seal. If the lid pops off, it hasn't sealed properly. I can't tell you how heart broken I was when I had to throw out a bunch of jars of peaches this summer when they didn't seal properly, and spoiled in my pantry. I will never skip this step again!

The renegade that didn't seal that had to be re-processed


You can label your jars however you wish. I just used a sharpie and wrote the contents and the month and year on the lids. The jars and rings can be reused. The lids can not.

Cooking down tomatoes for sauce


When the tomatoes were cooked down to the consistency I wanted, I filled the jars with them, using the funnel, and added 2 Tablespoons of lemon juice to each jar, stirring it in before sealing and processing the jars in the boiling water bath for 15 minutes. 

Tomatoes cooking down

Then cut up more tomatoes for another batch.

The quick way to chop peaches for jam


Back to the peaches. Some of the peaches were more ripe than others and so I used these for jelly. the recipe I used said to chop them into small pieces. I ignored this advice, and just threw the slices into my Bosch mixer with the batter attachment and set it on high for about 2 minutes, and then threw them into a big pot with the sugar, and water.

A TON of sugar goes into making jelly


 This mixture has to cook for a looooong time. Lots of stirring, and monitoring the temperature is necessary for making jelly. If you're not careful the mixture could boil over (mine did) or burn on the bottom (mine did) or cook too long and get too hot, thereby making your jelly too thick or cook too little time, making your jelly too thin. Using a candy thermometer is essential! 

Make sure you stir jelly frequently so that it doesn't burn!


Almost there! Using a candy thermometer helps

 Once the jelly is to the right temperature (about 220 degrees F) bottle it and process them in the boiling water canner for 15 minutes, and let rest. You can find a recipe for the peach jam here.

Ladling jelly into jars


Some recipes will tell you to skim off the foam. I didn't have much foam and didn't think it was necessary to do so, but sometimes half your jar will end up being foam, and so, you may want to skim. The skimmed off foam makes a nice treat for your family who are smelling the delights coming from the kitchen and aren't allowed to have any! 


A full days work of canning 8 quarts peaches, 4 quarts tomato sauce & 3 1/2 quarts jelly
 Happy Canning! Drop by and let me know how it went.
-Paulette


Saturday, February 26, 2011

It's a start

I have some great plans for redoing most of the furniture in my living room. This is just a start of it all. I'd love to finish everything in one weekend, but then what would I do with my time? Besides, stretching out the projects will be better on the budget, right? I found a set of these sturdy looking end tables at a thrift store a couple of years ago. One of them had been sanded and looked like someone had abandoned a refinishing project. I got both tables for $30.

Lovely scratched up top

I oiled them and they would look good for a week, and then they would go back to their dull finish. One of the tables now sits in my garage in pieces. I don't know if I can fix it or re-purpose the parts, but I decided that this one needed a makeover.  
Before


Three coats of Antique white paint, distressed with sandpaper and then glazed in all of the crevasses, gave it a new dress to wear. 


After
A trip to Hobby Lobby (or happy Land as I call it) and it had some new jewelry to wear. This knob only cost me $2 because they were on sale. Gotta love those Hobby Lobby sales. I was so distracted. I feel like I need to have blinders on, so that I'll only buy what I walked in for. I did almost as well. I took my handsome hubby, who wasn't all that happy about the detour on date night, but when I get a bee in my bonnet, I've got to finish what ever project I'm obsessing over!

Furniture Jewelry from Hobby Lobby

The whole project was very inexpensive to do. I spent about $18 on a gallon of paint, $2 on the knob, $1 for sponge brushes (to apply glaze), and $3 for a small bottle of antiquing glaze. I used so little of it, I'm sure it will last a loooong time. Now, on to the next project.
-Paulette

Friday, February 25, 2011

Boy Scouts of America


My time has been filled with the BSA this week. I am a cub master and we had our Blue and Gold Banquet on Tuesday. For all of you who are not in the know about the BSA. A cub master is a party planner and emcee. My day started off with brainstorming what to do for decorations. I had two criteria. It had to be cheap, and fast! The idea I came up with is not totally my own. It was shared by another talented cub master at one of the many round tables (classes about being a great BSA leader) I've attended in the last year. I bought 24 bottles of chocolate milk, and poured them into pitchers. I didn't need the chocolate milk. (thank goodness I have 5 kids who drank it!) Just the bottles. After they were washed and dried, I filled them with candy. The cubbies would used as table centerpieces and then given out as party favors after the banquet. The candy helped to anchor the bottles so that they wouldn't fall over while being painted.  Next using 2 cans of spray paint, I gave the bottles about 5 coats of paint. That's how many it took for them to become opaque. After they dried, I painted a peach half circle for a face. That too two coats, and a yellow kerchief. Again two coats for the paint to be opaque. Then I finished them off with some dots for eyes and mouths, and some pink dry brushed cheeks.  there's also a little bit of definition on the kerchief, just to show the knot. The brim of their hats are crescent moon shaped that are hot glued below the cap. I also made flags, by printing out 3"x5" flags on the computer and taping them to bamboo skewers. Three cubbies stood back to back with a flag in the canter. It was kind of like a little color guard. I bought yellow table cloths on a roll, and ran a white strip of paper down the center of each table and put a set of cubbies on each table. 

 I don't have pictures of the cakes I made. I baked two sheet cakes, and frosted them with white frosting. Then a wolf head shape was cut from a piece of printer paper and placed in the center pf each cake to act as a stencil. I shook blue sprinkles over the cake, and then removed the stencil and shook yellow sprinkles in the space left by the wolf head. 
The remainder of the gym was decorated with blue and yellow streamers and yellow balloons. The balloons turned out to be a hit with the younger kids. 
We had a potato bar for dinner. I provided the two pots of homemade chili. And then we had cake and ice cream. 
 the highlight of the evening was a presentation put on by Baden Powell himself! The week before the banquet, I delivered a mattress box to the scouts to have them build a time machine. After dinner, the time machine was brought out and Baden Powell emerged. The date of our shindig just happened to coinside with his birthday! As he came out of the time machine, he asked when he was, and decided to stay a while and talk to the cubs about the start of scouting. He was delightful. The boys and other children were entranced. 
This wonderful man researched Baden Powell, and then put together a presentation for his Wood Badge. He told the boys about catching monkeys, and why he was wearing a cowboy hat and neckerchief. He brought great props and pictures and really made the night wonderful.
"Baden Powell"  with the scouts

 Today is slower day. I am sewing on the patches of my eleven year old scout's uniform so that he can wear it for the first time to a day camp tomorrow morning.
 The Boy Scouts of America is such a wonderful program! When I was first asked to be a cub master, I thought, "me?! But I'm a girlie girl!" I  have enjoyed spending time with the little boys. And have even lost 50 lbs because of the scout program. I decided that I couldn't teach them about health and fitness if I wasn't following my own advice. I joined a gym that same week, and have loved my new healthy lifestyle. 
And the smaller clothes sizes. Teehee!
Gotta get back to the sewing. I have a date tonight...with my handsome husband.
-Paulette  

Thursday, February 24, 2011

I'm Convinced About Carpet to Concrete

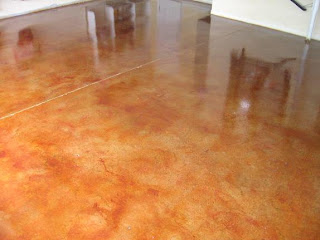
I have been obsessing over my dirty carpet for too long. I love the look of tile and laminate, but alas, those options are not in the budget these days. After looking through some pictures and reading up on the DIYs, I'm ready to jump in with both feet. As soon as possible. Take a look at these gorgeous examples.
stained with hand painted detail

Painted and stenciled

 
stained and sealed
Tearing out the carpet that has the honey stain that collects dirt even after the carpets have been professionally cleaned will be so liberating! I won't have to worry when the kids spill chocolate milk, or orange juice concentrate, both of which happened yesterday. Yesterday was BAD people! I cleaned mustard art off of the patio table, peanut butter off the picture windows, and the the a fore mentioned orange juice concentrate off the carpet. I have yet to get to the chocolate milk and yogurt on the carpet. *SIGH!* having five kids means vigilance! And I'm just too tired to be vigilant all of the time. I want a floor that wipes up in minutes. I think I've found my answer. Now, I just need someone to come over and move the furniture!
-Paulette

Wednesday, February 23, 2011

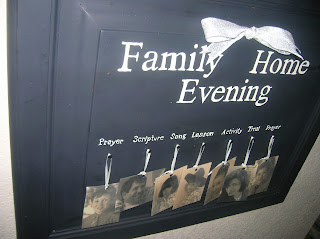
Trash to Treasure FHE Chart

Before
A few years ago a friend gave us an entertainment center with two book shelves. As we were loading it into our van, she warned me that the doors had been broken, and repaired. She raised 3 boys and two girls, just like I am currently endeavoring to do. She suggested that I take the doors off until the kids were older. I ignored her advice, and have repaired the doors twice...each. I'm done. The doors that are still intact have been moved to the bottom of the bookshelves, and hide video storage. The doors on the entertainment center have been removed, and are sitting in the garage. One of the smaller cabinet doors was still intact, and so I decided to transform it. After seeing this post , I got a bright idea to combine her idea for displaying her family pictures with a family home evening chart.

  
After


 I began by pulling together some supplies:

Craft acrylic paint in black and cream
Large paint brush, and a scrip liner paintbrush Drill with 1/2" drill bit
Scrap of ribbon about 12" long
White card stock
Transparency film
Thin ribbon
Black upholstery tacks
Hammer
Graphite paper for transferring my design
Ruler or measuring tape
Pencil
Hole punch
Spray adhesive

Next I painted the cabinet door in black, two coats of paint on the front and one on the back.
While you're waiting for the paint to dry, do some magic on your computer by changing some of your favorite family pictures to sepia, and print them out wallet size on white card stock. Next, spray the transparency film and glue to the pictures to laminate them. Cut them out, and punch a hole in the top, and tie on some thin ribbon.
Print out the words you're going to want on your chart. This could easily be changed into a chore chart. The words I chose were Family Home Evening, Prayer, Song, Scripture, Lesson, Activity, Treats, Prayer.
I printed them in the size of font that I needed for my sign, and after doing some measuring for the center, I cut out the font, and placed them where I thought they should go. next place some graphite paper under the slips of paper, with the graphite side down, and trace the words with a pencil. 
Remove the papers, and paint with the cream colored paint and your script liner. 
When your paint is dry, drill two holes at the top about 1/2" apart from one another. Thread your thicker ribbon starting on the right hole from front t back, and then slip the ribbon through the left hole from the back to the front. Tie a knot and bow. You now have a hanger on the back to hang your chart. 
Center the upholstery tacks under the smaller script and nail only part way in. Now hang your pictures from the tacks, and you're ready to go!
One less thing taking up space in the garage, and waiting to be "fixed." I've decided that baskets are all the rage, and that is the way that I store everything for the entertainment center. I'm also on the look out for the old VHS cabinets that were so popular in the 80's. Does anyone else think that DVDs are a rip off, because they scratch so easily? VHS tapes are only a dollar each at the thrift stores, and they last years longer than the DVDs do.
-Paulette

Sunday, February 20, 2011

Ballard Designs knockoff


We have been living in this house for 7 years, and for all of those years I have HATED the light fixture above my vanity mirror in my bathroom. Okay, hated might be a bit strong of a word. I did like that it provided enough light for me to see well enough to pluck and to remind me that I needed to wash away that gray. However, the light fixture itself is ugly. I thought that I would need an electrician to replace it. I also thought that one that I liked would cost a small fortune. I was wrong on both accounts. The one pictured is in the kid's bathroom. It's also our guest bathroom, which means it needs to be next on the to do list, but, I'm having fun redoing my boudoir. So, it's just gonna have to wait. 
 

The light fixture I wanted was in the Ballard designs catalog for $100. After years of wanting it, my mind inflated the price to $300. 
Ballard designs Vanity Lighting (It's the one at the top)

Whatever. It was still out of my budget. Being the savvy thrift store shopper that I am, I thought I could find one that I was happy with. And then, after looking through a few blogs, I discovered that spray paint is for more than tagging! There are spray paints that mimic metal in very convincing ways! I figured I could get the same look for a lot less, and so my mission began by looking for a light fixture with the same bones. I found a brass one (yuck) for $10 at Goodwill. Praying that there was nothing wrong with it, I brought it home. I began by pulling out (and buying) some crafting supplies:
Necklace Memory wire
26 gauge wire
Some crystal beads
Plastic leaves
Gorilla super glue
Aluminum foil
Krylon white primer spray paint
Rust-oleum Hammered finish  bronze spray paint
Wire cutters
Pliers


 The fixture I liked had vines of leaves with crystal "buds" at the end. So I started by making those. I straightened out the memory wire and bent it into half, and then added loops at the ends by wrapping it around the pliers. Next, the 26 gauge wire was wrapped starting at one end, adding some plastic leaves, between each bend and then ending at the other end of the memory wire. This stem was attached to the light fixture with more 26 gauge wire and glued into place with the Gorilla Super glue.

How do you like that lovely brassy finish? 
 Next, I wrapped the shades in aluminum foil, because they wouldn't come off. If they had come off, I would have just stuffed some paper into the light sockets to protect them from being painted. 

 A nice coat of Primer came next. After reading the label of the hammered bronze paint, I could have skipped t his step, but, I wanted to make sure that the paint would stick to the plastic leaves.


 Once that was dry, I applied two coats of the rust-oleum hammered bronze spray paint. And impatiently waited for it to dry. 


Once the paint was dry, I removed the aluminum foil and glued the crystal beads to the ends of the wires. 
Then, all I had to do was put it up. Make sure you turn off the power at the breaker box. This didn't make my kids too happy, since I didn't know which switch went to which room, I pretty much turned them all off. When the "power went out" they had a fit. Bwahahahahaha. It's fun to wield that much power.  When I'd finished, there were some scratches where the fixture had rested on the mirror while I wrestled with it. Those shades are HEAVY! A little paint sprayed into a bowl , and applied with a disposable paint brush fixed those little problem areas. Then I prayed and held my breath as I turned the power back on and Hallelujah! The fixture worked, and looked beautiful in my bathroom. Now I just have to wait for the tax returns to come in so that I can paint the bathroom. 
-Paulette

Saturday, February 19, 2011

One Wild Ride

Around 5 :30 yesterday evening I was sitting at my computer playing a card game with my 2 year old daughter climbing all over me, thinking how much I really needed a nap, and "when is Dave getting home?" When I heard a scream come from outside my bedroom window from Chris, my 6 year old son. Startled out of my semi-daze I jumped up to go find him and find out how he'd injured himself and administer some mommy boo boo relief in the way of kisses and an ice pack, while holding him on my lap. It quickly became apparent to me that this was not going to be enough. Chris told me that he'd fallen from the swing and hit his head. He was developing a bruise on his left temple, and my first thought was to get him an ice pack. I picked him back up and cuddled him and he began to fall asleep. While I was laying him on the couch, he said, "Mommy, you look weird. I can't see you." My immediate thought was that he had a concussion, and I went to my computer to look up what I needed to do. Dave got home, and I told him what had happened and that I needed to take Chris to the hospital. Chris woke up crying, "Mommy mommy mommy," over and over again, and then started repeating, "I don't know what to do." I told him I do, and carried him out to the car. When we arrived at the urgent care, a nurse noticed that things weren't right and asked about Chris. He took us to the triage as soon as was possible. Next thing I knew there was talk of an ambulance and going into Phoenix to the children's hospital.

 
At the urgent care Chris was in and out of sleep, but once we got into the ambulance, he started to perk up. As we got in I mentioned to him that it looked like the inside of an ice cream truck!

Chris asked a question about the "doctor." To which the paramedic said, "if you're going to give me a promotion, I want the raise to go with it." Chris thought about this for a little while and then said,  "How about a dollar?"
When I explained that a dollar is a lot to Chris, but not to the nice paramedic, Chris offered him "a dollar and nine cents."
 My little guy was in earnest. He really would have given all of his money to the paramedic! I was so relieved that Chris was returning to my wonderful little fella again. As we entered the ER and were questioned, he was able to give some of the answers himself and enjoy watching cartoons. He said that the cat scan machine reminded him of a freezer. (It was cold.) 
I am so thankful that there are people who know more than I do, and that I have access to those people. From the information that I was able to get on the internet about concussions, to the doctor that knew that the kind of injury Chris had, could have developed into a lot more. I know this is going to add up to a huge bill, but I am so relieved that my cute little guy is okay. Isn't he adorable? By the way, I've done the ambulance thing once. there's no need to repeat it, okay? 
-Paulette

Friday, February 18, 2011

If I'd known it was going to be this cheap I would have done it years ago!


Do you have monkey bars in your bathroom? You may. It's called a towel bar, and my kids think it's a monkey bar to hang on. And with 5 monkeys in the house, it didn't stay looking very nice for very long. I've been admiring crystal towel hangers for a long time and loved the old timey look. I just didn't think that it was in my price range because crystal hangers are expensive, right? WRONG! While at hobby Lobby one day, I was looking at their huge selection of drawer pulls. They happened to be on sale that day, which meant they were only about $1.50 each. Okay. Now what? A quick jaunt over to the woods section found me little plaques. They were 2 for $1. Wow! This is going to be cheap. For About $5.50 I was able to have three hangers! Cheaper than a new towel bar. So, this is how I did it. First find some wall anchors that fit the screw end of your drawer pulls. Next drill a hole in the wall (after you've measured where its supposed to go, right?), and pound in your wall anchor. Next drill a hole in the center of your plaque. Paint and distress your plaques, and then slowly screw the drawer pull into the plaque until you start to see the end emerge. Now, line that up with the anchor on the wall, and while holding the plaque flush with the wall, screw the drawer pull all the way in. You may want to give the plaque a few turns to get it flush with the wall. That's it. easy, huh? 


Here's another cute solution to the boring towel rings available. Mine is a plant pot hanger...upside down.

Today I'm working on a Ballard designs knock off. I'm taking lots of pictures along the way. I can't wait to show it off!
-Paulette