Saturday, April 9, 2011

Refurbished Fruit Bowl

Posted by: Paulette
My Friend Becky's birthday is today. The girls (Katie 4yrs and Sophia 2 yrs) and I went shopping at Goodwill yesterday to buy her a gift. 

After looking around and picking things up and putting them down again, and taking things out of the girl's hands that they'd picked up, and putting it back on the shelf, and arguing about why Katie was not allowed to walk around by herself, whew! I found this lovely fruit bowl.
A little too...shall we say fancy schmancy or maybe just a little too gold, for my tastes. And her's too. She keeps chickens in her back yard along with her farm. At least that's what I call it. I have serious garden envy!
Back to the bowl. I thought that a little primer and a little paint would make this bowl more suited to her tastes. I painted the base with two coats of primer, and two coats of Antique White latex in semi-gloss.
2 coats of primer
And then painted on some antiquing glaze, making sure to get it into all of the grooves, and then with a damp paper towel, I rubbed it off of all of the convex surfaces.

All done!
 And this is how I'll be giving it to her. Unless the kid's eat all of the oranges! 


Now THAT'S pretty!

Mom always said that a gift is good when you want to keep it for yourself. I think this one fits that bill.

Friday, April 8, 2011

My version of the PB Frame Riser

Posted by: Paulette

 Pretty Cool how that one frame is "floating" in front of the other ones, huh? Do you want to know how? This is how:


When I saw this:

image from Pottery Barn

I thought the effect was so cool that I wanted one. But then when I saw that they wanted $16 for it, my gears inside my head began to turn, and then I realized that I could MAKE ONE! Cool huh?
The best part of all of this is that I used stuff I already had. So this little guy cost me nothing to make. You read that right NADA!
And now I'm going to teach you how to make one.

You will need:

A saw of some type. (I used a jig saw.)
Scrap wood
A wood dowel
A drill bit to match the diameter of your dowel
Drill bit a bit smaller than the diameter of your screws
2 longish screws. (mine were about 2" long)
A saw tooth picture hanger
1 small screw (mine was 1/2")
Primer and paint optional
A ruler or tape measure
A pencil or pen

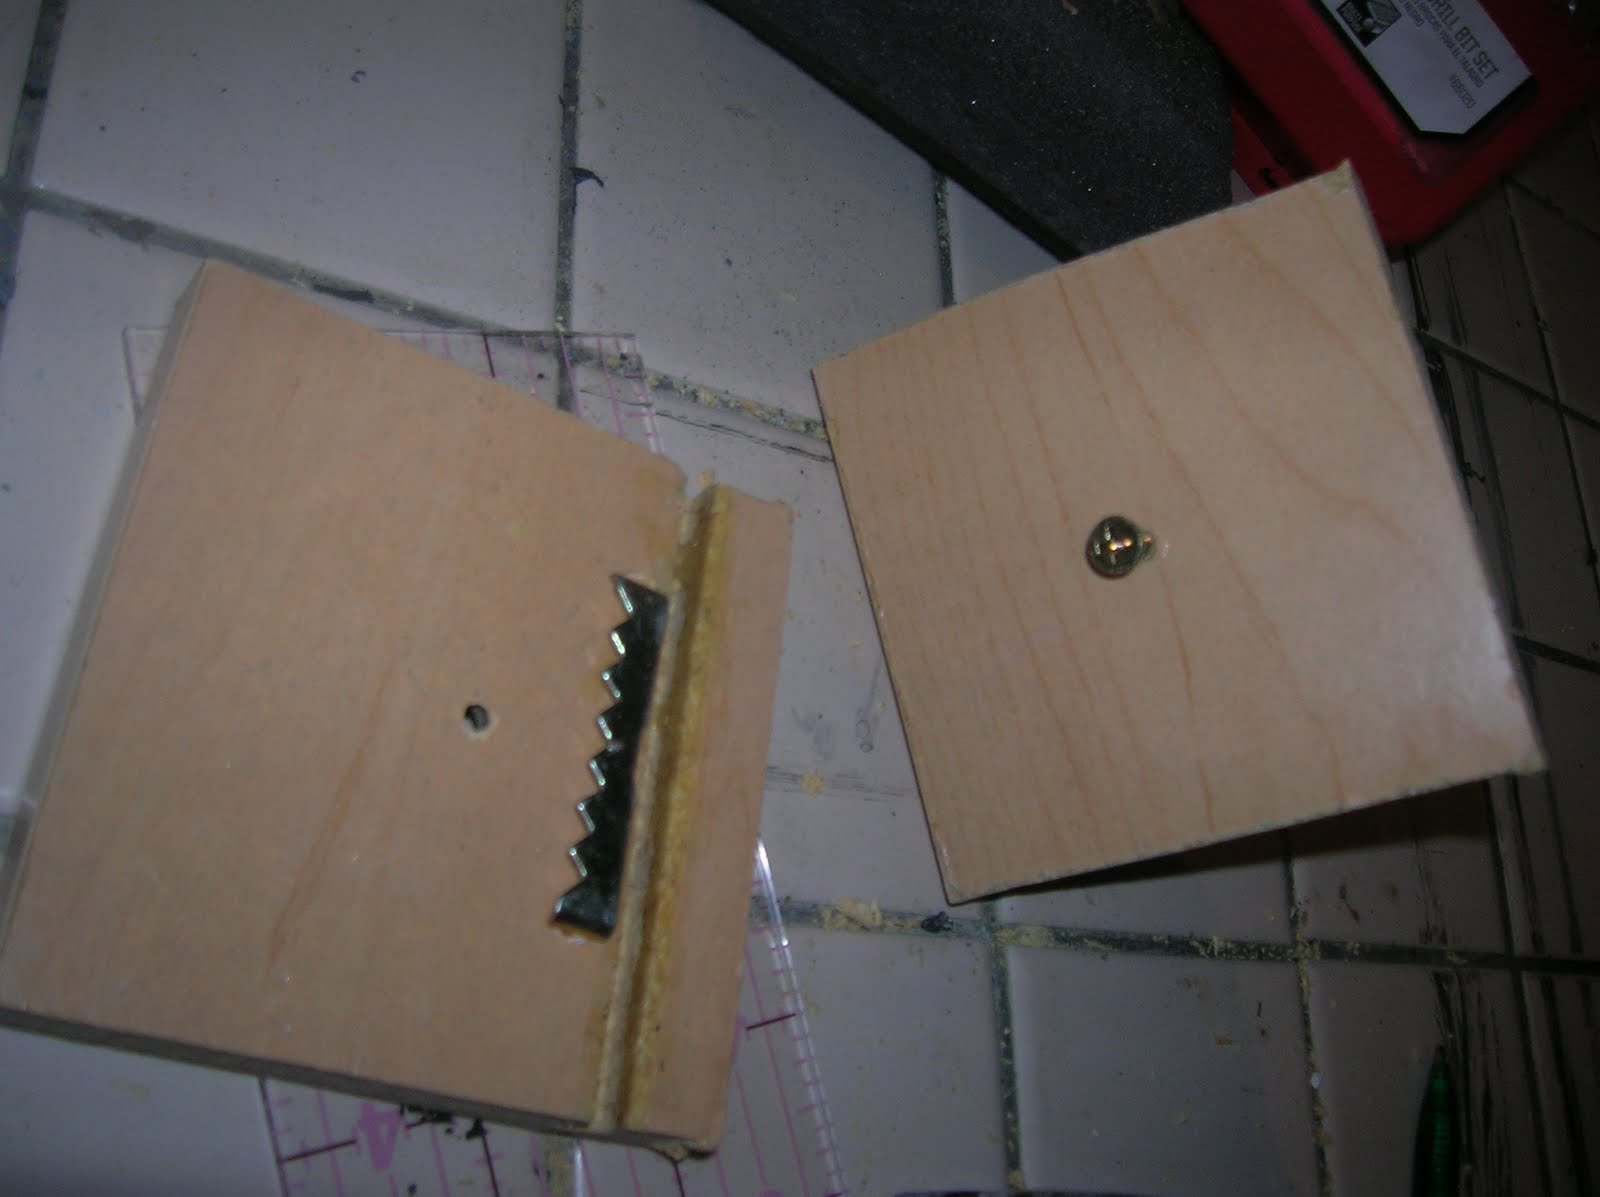
-I started by cutting my squares. I used wood from a kitchen drawer that came apart. My 
   squares are 3.5"x3.5" square. And sand the edges smooth.
-Cut your dowel about 4" long, and sand the edges just a bit.
-Next, using your drill, drill a hole in the center of each one, about 1/4" deep. This is where  
   your dowel is going to sit.

-Drill a hole in the center end of each dowel.
-Place the saw tooth picture hanger center top, on the back of one of the squares.
-Screw through the front of the other square, fitting the dowel in the hole and finish screwing the screw into the
   dowel.
-Place second long screw through back of other square, placing dowel into it's hole, screw through to dowel.
You should have something that looks a bit like a dumb bell. (Which is a bit how I'm feeling right now trying to explain this.)

- Next, finding the center top of your front square, place small screw, and screw down until some of the screw is still up. 

( This all sounds really strange to me. I hope I never have a job explaining how to put furniture together. Someone will have bought a book case and ended up with a porch swing, with my directions.)

-You now have the option of painting your lovely new piece of hardware. The saw tooth picture hanger hangs on a nail on the wall, and your picture hands from the small screw on the front.

Now, maybe you'd rather go order one from PB! LOL!
By the way, all of the art work is mine and of my beautiful children when they were babies. They grow up so fast!!!!

Wednesday, April 6, 2011

A Break From the Black

Posted by: Paulette
I'm a bit tired of scrubbing and painting cabinets. And I'm a bit tired of the color black. I know that the cabinets will be beautiful when they're done, but, I just need a mood lifter. I was inspired one day while looking through blogs by a laundry room door. I know, your saying, you've got to be kidding!P It was a beautiful focal point in an otherwise blah hallway. I wish I could give credit where it's due, but I honestly can't remember where I saw it. The other item that fired my imagination was this table at The Shabby Chic Cottage. And there was atutorial on how to get the look!
Image from The Shabby Chic Cottage

I'm using paint that I already have. I hope that when I'm done I'll have the look I want. Here's a close up of what I have done already.
The picture doesn't show it very well. 
Here's the other thing I made today. I'll tell you all about it in another post.
Things that make you go hmmmmm.

Tuesday, April 5, 2011

Black Cabinets!

Posted by: Paulette
I've been really busy the past few days taking cabinet doors off and painting the cabinets. I have to say that this is a really long project that I will be happy to have finished. Especially since I can already see how beautiful the results are going to be. It's amazing to me how paint can transform blah to beautiful, and dingy and old to clean and new. 
Here's the before:
I love the paint treatment on the walls in my kitchen, but the cabinets really fade into the background. And since they are so light everything that gets on t hem stains them. I've banned Kool Aid from our house, but somehow there are other things that get on them. The cabinets above are relatively clean. The ones below are filthy! Hopefully not a testament to my poor house cleaning, but what 5 kids can do to destroy a house!

Remember when I said I had plans for all of that robin's egg blue paint I have left over from this project? Well, I bought some acrylic paint in blue and yellow and re-tinted it to a gorgeous teal. It matches the tile in my kitchen. When we first moved into this house, I hated that tile. All I could think of was that it looked Southwestern. Just not my style. And I've fought it for 8 years. When deciding to paint the cabinets I embraced the tile color and just went with it. I'm so glad I did! take a look at this little teaser.
These are the only cabinets without doors on them. I love how all of my dishes look against the teal background.
Here's another teaser. These are the cabinets above the refrigerator. I started by scrubbing everything down with a Scotch Brite cleaning pad. You know the kind that has the green scrubber. It was like sand paper! I also used a solution of 1 part vinegar to 1 part water, and a squirt of dish soap. If the cabinets were covered in grease, I also used baking soda to clean them off. Then I used a grey tinted primer, and 2 coats of Wal-mart brand Color Place latex paint in Dark Coalmine in semi-gloss. After they had dried, I distressed them with a sanding sponge and stained the areas with an antiquing glaze. I still have to put some poly on them, but they look great, don't they?

I'm not quite ready for the reveal. And the worst of the cabinets is yet to come. The ones under the sink. But, I couldn't wait to share.

Monday, April 4, 2011

Stuffies!

Posted by Jvona

This little guy, which I made for my littlest guy, was made out of  two baby washcloths and felt.

I think he loooooves him! I also made one for Rachel and her little man, Jed, but I think he got left behind in the sound room at The Boy's band practice, so he will have to make his 3sisters blog debut at a later date. (Sorry sis... I had it done in time for mom to bring with her on her visit, but I guess he wanted to stay in Florida a bit longer...I don't blame him, I hear its pretty dang cold there in Jersey right now!)

I made this guy for another one of my sons. A teddybear I bought at Goodwill sacrificed his life for this eyeball finger puppet.
Ok, so he didn't sacrifice his life, just his leg. ;-)

Sunday, April 3, 2011

Indian Dinner

Posted by: Paulette
My Aunt came back from Australia this week. We usually have dinner together on Saturday nights, and I decided to do something a little special. Indian night! I've been making Indian food for years now, and don't have to even look up a recipe. Last night I made Tandoori Chicken on the grill, Wheat Naan, Daal Makhani, and Mango Pickle. The Mango Pickle was made about three weeks ago and has had some time to marinate in it's juices. For dessert we had Brown Rice Pudding. I was asked by some friends to share my recipes. I will try to remember what I used and how much, but, usually I use my hand or dump into the pot until I think it looks right.
So here we go!
Tandoori Chicken

4 boneless skinless chicken breasts
1/2 plain yogurt
2 Tablespoons fresh lemon juice
1 Tablespoon minced garlic
1 Tablespoon peeled, minced ginger root
1 Tablespoon ground cumin
1 Tablespoon ground coriander
1/2 Teaspoon crushed pepper
1/4 Teaspoon ground cardamom
1/4 Teaspoon ground cloves
1/4 Teaspoon ground black pepper
2 Teaspoons sea salt
Vegetable or canola oil for oiling grill

Using a sharp knife cut small slits all over the chicken. Mix together above ingredients in a plastic or glass bowl. Rub all over the chicken and place in a glass or plastic container and refrigerate for 8 hours or more.
Heat grill to hottest setting. Turn heat down to low. Oil grill, by using a paper towel soaked in oil, place over the end of a spatula and rub over grill. Turn the grill back up to high, and place chicken on it. Let cooked with grill closed for about 8 minutes. Turn chicken over, and turn heat to low. Let cook 12- 15 minutes, depending on the thickness of the breasts. Place chicken on platter and cover with a piece of foil and let rest. Cut into 1 inch slices and serve, or serve whole.
Traditional garnishes are tomatoes, raw onions, cucumber slices, cilantro,  lemon slices and plain yogurt.

Daal Makhani

1/2 Cup kidney beans
1/2 Cup black beans
1 Cup lentils
1 Large yellow onion chopped
2 Inches fresh ginger root, peeled and diced
4 Garlic cloves minced
1 Tablespoon  whole cumin
1 Teaspoon ground cardamom
1 Teaspoon ground cloves
1 Teaspoon crushed pepper
2 Tablespoons olive oil
3 Tablespoons sugar
1 Tablespoon sea salt

Place all of the beans in a crock pot set to high with enough water to cover beans plus 1 inch extra water.
In a pan, heat 2 Tablespoons olive oil to medium high heat, add onions and cook until transparent. Add other ingredients and cook until fragrant. Put onion spice mixture into crock pot. De glaze the pan with about 1/4 cup water. Pour into crock pot. Cover and cook for 8 hours. Add salt and sugar before serving.

Wheat Naan

2 Teaspoons yeast
1 1/2 Cups warm water
4 Tablespoons olive oil
1 Teaspoon sea salt
1 Cup white flour + more for rolling out
About 3 cups wheat flour

Place pizza stone on middle rack and heat over to 500 degrees.
Mix together yeast, water, oil salt, and 1 cup white flour. Gradually mix in wheat flour, until you make a dough. Continue to knead and adding flour, until dough feels like traditional play dough consistency.
Place in oiled bowl and let rest 10 minutes.
Pinch off enough dough to make a golf ball size roll. Continue, placing balls around area where you'll be rolling them out.
Dust surface with white flour. Push a ball into the flour using the palm of your hand. Coat both sides of dough. Roll once on one side, and then flip dough and roll in the other direction on the other side; i.e., vertical and then horizontal.
Once you have 3 to 4 place on pizza stone. Bake for about 2 minutes and then turn over.
Bake for about 1 minute more. Pull out of oven and lay on stove top to cool while you put in the next batch. Now you can place the bread into a bag to sweat. This will make it soft and chewy. 
Repeat until all discs have been baked.
Mango Pickle

4 Green, hard mangoes, peeled and sliced
Dried thin red chilies
 (this will determine how hot your pickle will be. Be cautious!)
1 Cup sugar
1/2 Cup vinegar
4 inches peeled chopped ginger root
Place sugar and vinegar into pot. Simmer until sugar is dissolved. Place remaining ingredients into pot, and heat through. Ladle into clean hot jars, and place caps. If you want to store outside the refrigerator, put into a boiling water bath for 8 minutes to seal lids.


Brown Rice Pudding

2 Cups brown rice
4 Cups water
2 tablespoons Cinnmon
1 Star Anise
2 Cups Evaporated milk
3/4 Cup Craisins
1/4 Cup Shelled, raw Pumpkin seeds
11/2 Cups brown sugar
Cook Rice in water with cinnamon and star anise until soft. Add remaining ingredients and simmer stirring occasionally until mixture thickens.
Note: I used craisins because I was all out of raisins, and I used pumpkin seeds because I have a nut allergy. The more traditional ingredients would have been raisins, with cashews, peanuts or pistachios.


My aunt made a wonderful mixed salad with balsamic vinegar and olive oil dressing. The plates looked beautiful and tasted delicious. Let me know if you decide to try any of these recipes and if you liked them.

Thursday, March 31, 2011

Just Your Average Day

I love being a stay at home mom. I get to do what I want to do almost every day. I say almost because who really wants to clean up vomit?
People are amazed at what I can accomplish in a day. I love to multitask. There's a lot you can do while waiting for the paint on the kitchen cabinets to dry.
Yesterday, I was exhausted after my usual day, and had a date to go out with a friend for some frozen yogurt to celebrate my birthday which was last Saturday. I got to bed about 10:30, and Hubby let me sleep until 7 today. Bless him!
In an average day I get up at 6am, clean up the kitchen from the night before, hang out a load of laundry (since my drier broke. Hopefully this is not a forever thing), pick up the living room, and get a couple of girls dressed. Sometimes I'm in charge of making the boy's lunches and breakfast for myself and the hubby. A protein smoothie is the perfect on the go breakfast. Sometimes the clothes go in the car with the girls to be dressed later.
On the good days, I get up at 5:30am and go  to the gym to work out for an hour before coming home to help everyone else get ready for school and work.
There's a lot of yelling in our house in the mornings. And usually the phrase is " GET DRESSED!" I don't know why it's so difficult for my boys to get themselves dressed, but it is.
After dropping everyone off, I get to either go grocery shopping with the girls, or come home for more cleaning up and whatever else I feel like doing. 
So what are we up to now? Somewhere around 10am? Today I was scrubbing the kitchen cabinet to prime and paint it. The 2 year old runs in carrying a bottle of shampoo, which she has drizzled across the house and is covered in. This is why I buy Suave at less than $1 a bottle! The four year old is naked and sitting in a doll chair in front of the front screen door. My neighbors do NOT need to see this! I yell at her to get dressed, and she just giggles at me. After cleaning up the 2 year old and getting the 4 year old dressed again, I put a coat of primer on the cabinet. Then a neighbor drops by and gives me a HUGE bag of lemons and 4 dozen eggs from her chickens. I can see lemon curd on the schedule for tomorrow, and another cabinet being painted. I get a phone call from another neighbor. "I found the box of lemons we were looking for yesterday. They were in the garage." LOTS OF LEMON CURD...
And maybe some lemon juice for the food storage.
It's about 11am. I've put another load of laundry out on the line, put a clean slipcover on the loveseat, and put the 2 year old down for a nap, after picking up their room. Time to fold some more laundry and put a coat of paint on the cabinet, since the primer is dry.
Check the e-mail, and see that there's a shut off notice for our city utilities, but the check is in the mail and they should get it today. It's now about 12:30, and time for some lunch. I guess I'll go fold that laundry on the couch. The 4 year old wants some eggs for lunch. Sounds good to me. So does a nap!
And the day is not yet over.

So what is your average day like?